
10 Ways to Elevate Your Smartphone Photography

Happy Superbowl Sunday my dear readers! I’m not much of a football fan, but I imagine the day must be quite exciting for the sports enthusiasts out there. Despite the occasion, this will not be a post about how to shoot better sports and action photos. Instead, I’ve been feeling the need to write a follow-up post to the one from two weeks ago, the one where I tell you not to go out and buy a new camera. At least not immediately. So if you don’t buy any new gear, but actually want to take better photos, how can you elevate your photography with the camera you most certainly already have, aka your smartphone?
Fear not! I have compiled ten tips to immediately improve your smart phoneography.
They are as follows:
START WITH AMAZING LIGHT
What does that mean? Well, there are photographers out there who proclaim that no light is “bad light.” While I do (mostly) agree with them, I also know from experience that great light makes for greater photos, especially if you are using a simple camera, such as the one on your phone. So what is great light? It is the light that falls at the beginning and towards the end of the day, also known as the golden hour light. It is the soft, low light that creates beautiful shadows and illuminates color. It makes everything appear more vibrant and warm as well as more three dimensional. It will make your photos appear instantly better, no matter the subject. Now, I am not saying you should only shoot during the golden hour, that is absolutely not my intention. What I am saying is that if you find your photos falling a bit dull and unexciting, try shooting when the light different than your usual midday sun and I bet your photographs will take on a different character instantly.


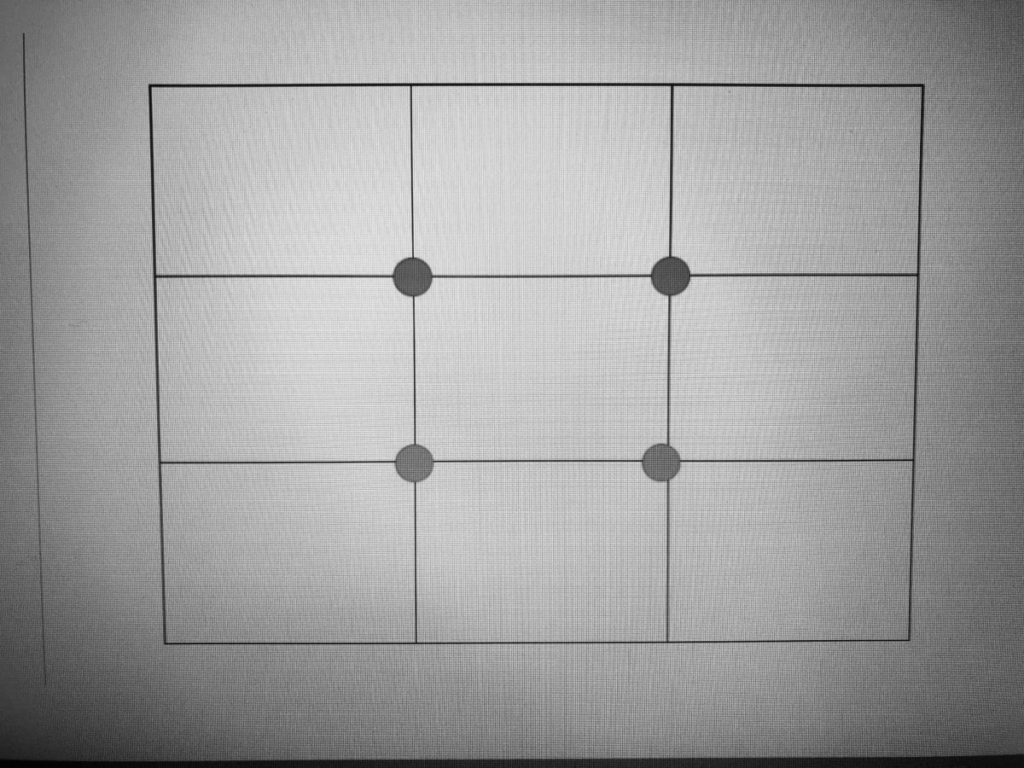
USE THE RULE OF THIRDS
This famous rule is very well known and frequently implemented in the photographic world. It is a compositional rule that creates more dynamic images than simply placing your subject in the middle of the frame. It is super easy to utilize and it can really help beginner photographers create much more visually appealing pictures. Best news is that you can start using it immediately, (yes, right away!) to improve your photography. And using a smart phone is a perfect place to start. Rule of thirds involves breaking the image into nine equal squares. Whenever you place your main subject at the intersection of these squares, you create a more dynamic and interesting photo. Craziest part is, most smart phones (OK, the newer iphones for sure, I am not hundred percent certain about other brands) have a GRID option you can turn on in Settings that already superimposes the rule of thirds onto the screen for you. You don’t even have to imagine it in your head – it’s right there! Turn the GRID option on, fire away keeping this simple compositional technique in mind and see your photos transform in front of your eyes.


GET CLOSER!
A famous photographer once said, “If your pictures are not good enough, you’re not close enough” (Robert Capa). I believe this to be especially true with smart phone photography. In order to create more intimate, moving images, we often have to place ourselves closer to the subject we are photographing. Since smart phones’ only option for zooming in is a digital zoom, which often creates grain and degrades the overall quality of the photo, it may not be a bad idea to simply place the phone physically closer to our subject, whenever possible of course. This will eliminate all unnecessary elements from our frame and simplify the composition, which frequently helps the overall message we are trying to deliver. Another bonus is that a phone is usually a lot less intimidating to potential subjects than a big DSLR with a telephoto lens. Try getting closer to your subjects and see what images you can get.

TRY DIFFERENT PERSPECTIVES
Sometimes all we need to create much more compelling images is to change our perspective. Instead of shooting someone head on, try moving to the side, go really low or really high (by climbing a chair or a bench for example) or get down to your subject’s level, which may mean lying down on the ground to create a more intimate encounter. I find that changing our angles dramatically changes our photography, most frequently for the better. And the best part is that shooting digital means you never have to worry about too many exposures! Shoot your subject from every possible angle before you make the final decision about which shot truly nailed it.


FOR PORTRAITS AND PEOPLE, TRY AN OPEN SHADE
You know that time when you took your friend’s picture and instead of seeing their blue eyes you saw dark shadows? And let’s be honest, didn’t they look much better in person that day than in your photo? That’s because you shot them in direct, harsh sunlight instead of moving them into an open shade! Here’s a little (quite well known actually) secret that makes for much better portraits instantly: taking a photo in a shaded area makes your friend look a lot more attractive than taking it in bright daylight on a sunny day. This doesn’t apply as much to golden hour (see above) as the low light creates a much more pleasing appearance, but if you are shooting portraits in bright daylight, consider the shade your greatest asset. Those blue eyes will pop for sure!
SIMPLIFY YOUR BACKGROUND
There is nothing more that ruins an otherwise great photo than a distracting background. Thankfully, it’s also one of the simplest things to correct almost immediately. Whenever you point your phone in the direction of your main subject, quickly glance behind and to the side of them to assess what’s really there and whether it will add to the subject or distract from them. If the background is really distracting (poles coming out from behind, crowds of people walking by, geometric shapes that stick out strangely for example) consider either moving your subject to a less “noisy” area or move yourself to a different spot to eliminate some of those disrupting elements from the frame. This will simplify your composition, perhaps add an interesting angle (see above) and help your overall image to tell a better story.

MAKE YOUR PHOTOS THREE-DIMENSIONAL
Even if you keep your background plain and your composition simple, you can still make your photos more three-dimensional by carefully selecting your foreground, middle ground and background elements in your final image. Using the three with intention takes something that is usually two dimensional and translates it into something that we normally experience in reality. When chosen thoroughly, foreground elements will gently lead your viewer into the main subject and the background elements will add interest to the overall picture. You don’t need a fancy camera to do this. Your smart phone is perfectly capable of capturing all three and transforming your image into a story.


LOCK IN YOUR EXPOSURE
Whenever you point your camera phone onto your subject, the built-in sensor takes a reading and tries to adjust the perfect exposure based on how much light is entering it. Phone cameras are very good at this, but unfortunately not great, meaning there will be times when you have to “help” your phone recognize the proper exposure. Whenever your subject appears a bit too dark on screen while you are trying to take a picture, touch the screen with your finger over your subject area to tell the camera what it needs to expose for. Once you see that the subject is brighter, hold the finger for a few more seconds until the square “blinks” and locks the exposure in, even if you re-arrange the composition (to meet the rule of thirds for example). This is true for most iPhone models and I predict for other phone models as well as it has pretty much become a standard these days. You can perform a similar technique for a subject that is too bright, as in for a sky that looks blue in real time, but appears washed out (completely white) on your screen. You can place your finger on the overly exposed area, see it get darker and hold down to lock the exposure. This is a trick that is really worth knowing and utilizing in appropriate situations.
USE BURST FOR MOTION
If your subject happens to be a squirmy child, a fast running dog or simply an athlete showing off her skills, you can use the burst method on your phone to capture multiple images and dramatically increasing your chances of getting that perfect shot. Essentially BURST = FAST ACTION. To choose burst mode, simply hold down the shutter button while you are taking your picture. This will allow for multiple shots to be taken and you get to choose the best ones later.
EDIT IN CAMERA
I cannot tell you how many times I’ve used the editing tools of the smart phone camera itself to improve my exposure, increase contrast and crop the photo to a more desired composition. While I try to take the best photograph that I can in the moment I am taking it, using minor editing is frequently unavoidable. Most smart phones today have editing tools accessible right in their built in camera mode and they are only getting better with time. Sure you can use a variety of apps available for this very reason (my two favorites are VSCO cam and PS Express), but why waste precious time launching the apps, importing our photos, tweaking endlessly and then exporting to photos somewhere else when we can do that almost immediately in the same place after taking the actual picture? I’ve found that rapid tweaks done immediately upon exposure make for some of my best photos. And if you follow some of the tips I’ve shared here, your editing process should become super simple and time saving.


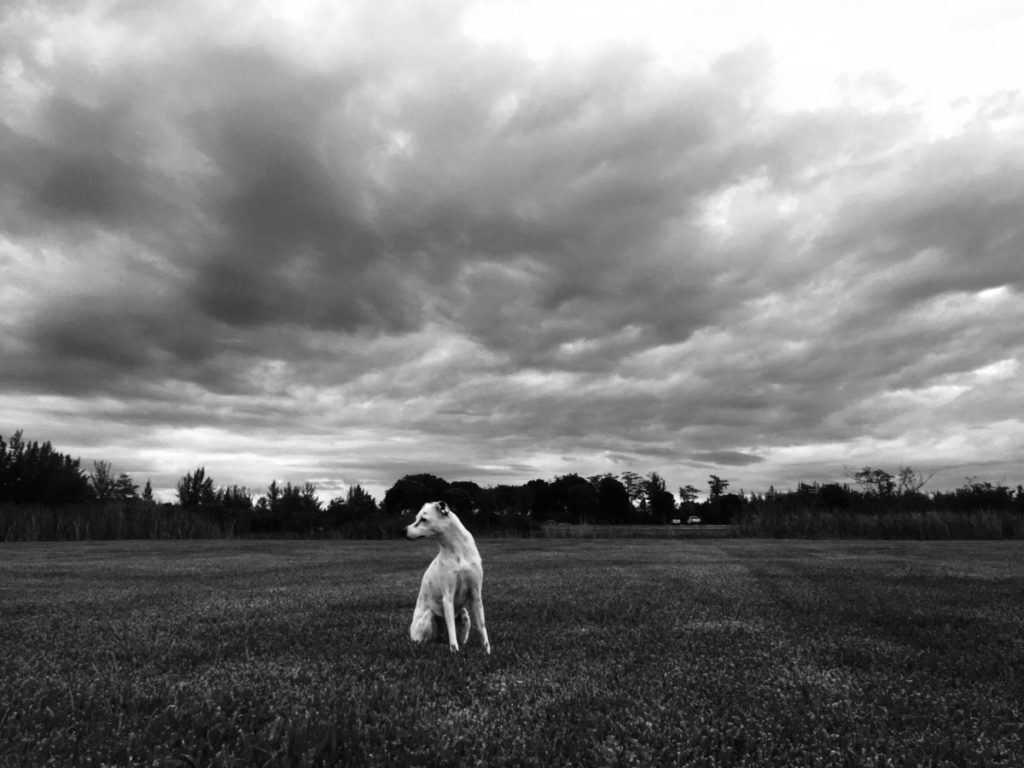
So there you have it, my best tips for improving your smart phoneography. As in last post, the images I’ve included today are all done with my iPhone and with minimal editing. I hope these help you guys in taking better everyday photos and I would love if you share some of them with me, either here in comments or on your social media sites, with the hashtag #thisphotographylifesmartphone
And please subscribe to my blog so you never miss another post (keep scrolling to the bottom of this post)
Hope to see you there!
Related Posts

Photographer Spotlight: Chris Suspect
Throughout the recent years, as I’ve attended various photography events, I’ve come to…
February 25, 2020
Why You Should NOT Buy the New Camera…and Use Your Phone Instead
This is a post I have been meaning to write for a while. It’s…
January 19, 2020
Betty | 2nd Feb 20
Sooo helpful and relevant!!!
Megan Kwasniak | 5th Feb 20
Thanks so much Betty! I know you always take lots of photos with your iPhone and they’re actually quite good! Hope these tips help make them even better 🙂
Justina | 4th Feb 20
Great tips for taking great pictures..but I can never be as good as you!!
Megan Kwasniak | 5th Feb 20
Thank you Justina! I so appreciate it! Anyone can learn to take great photos, I promise you that 🙂 I hope these tips help, especially when iPhone camera is all you got on you 😉